Kulturra brings you a new feature in the Summer '23 release - Subscription Billing. This feature allows for a faster and more straightforward process of creating recurring invoices.
Subscription Billing is a Lightning Web Component (LWC). This means you can now integrate this component into a lightning record page or use it in a flow.
How to Add Subscription Billing to the Page layout
To take advantage of the Subscription Billing feature, add this component to the Lightning Record Page of your chosen object (i.e. Opportunity). Here's a quick guide on how to do that :
From Setup, click on Edit Page (ensure that you are viewing a record i.e. Opportunity record so you'll be routed to the object's lightning record page).

Drag and drop the Create Subscription component in your desired location. If you want a cleaner look, you can also create a Tab.
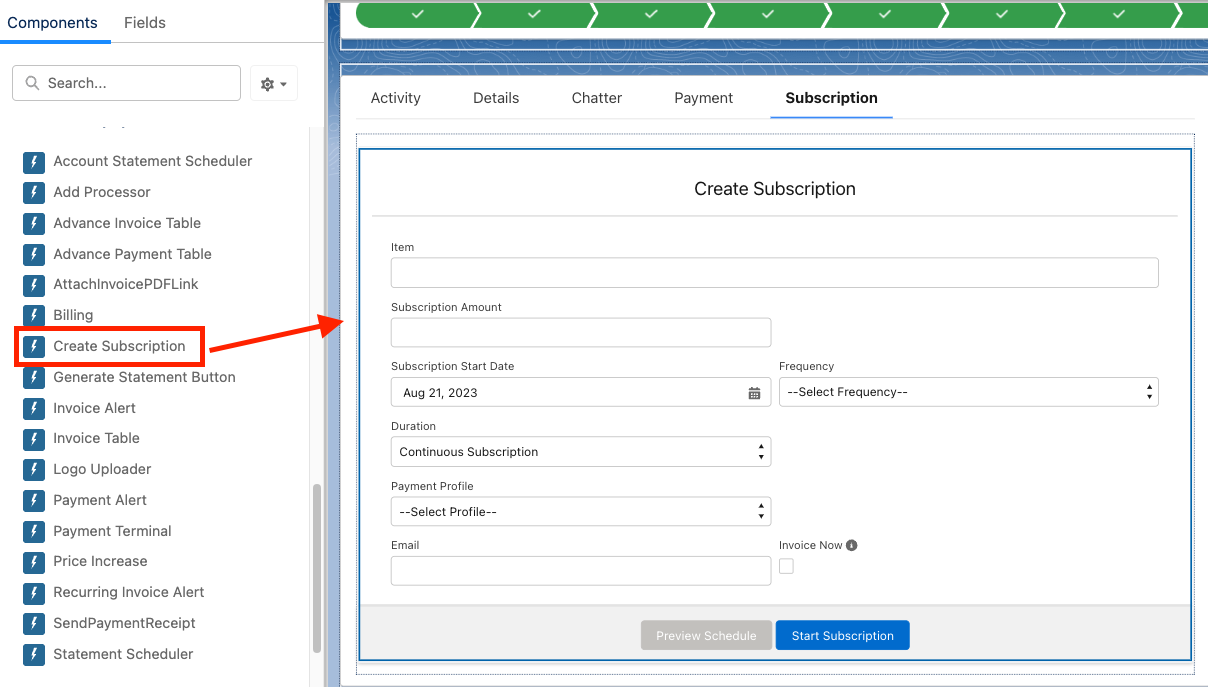
Click Save so changes will be reflected on the record page.
Creating a Recurring Invoice Using Subscription Billing Component
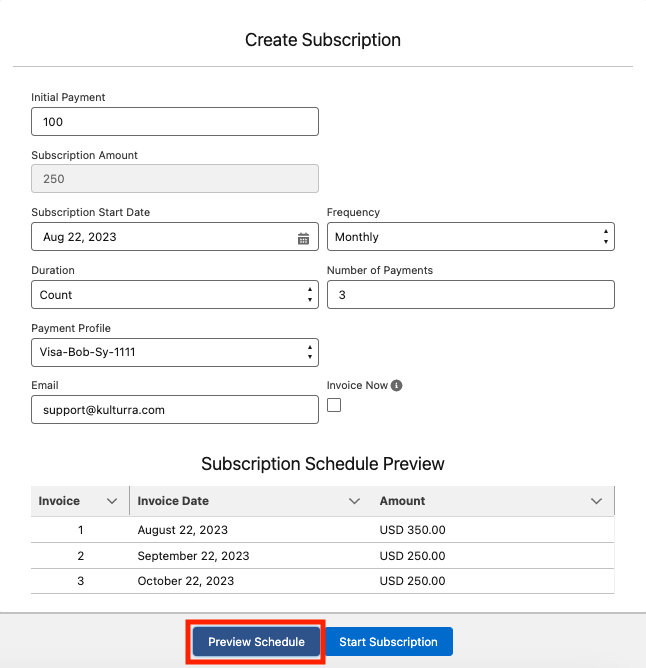
Creating a recurring invoice is a breeze with the Subscription Billing feature. Here's a simple step-by-step guide on how to do it.
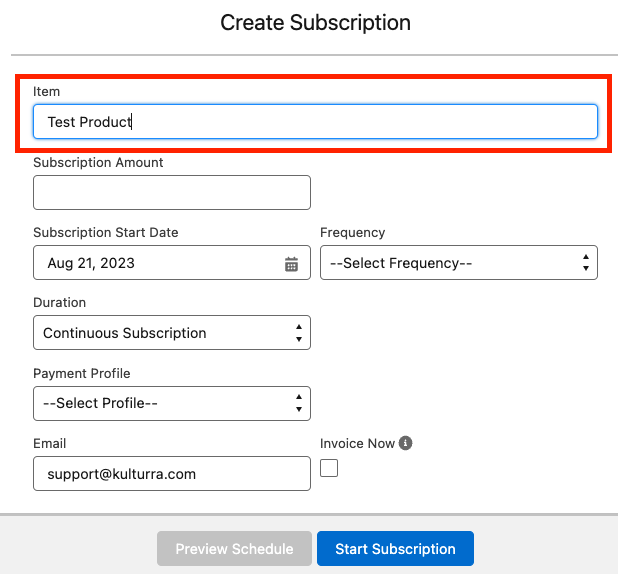
Step 1: Add a Line Item
Start by adding a Line Item. This will be the service or product for which your customer will be billed repeatedly.
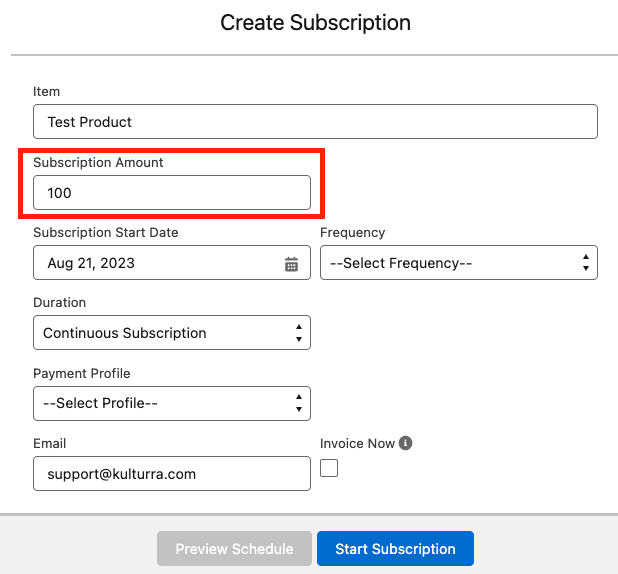
Step 2: Input the Subscription Amount
Next, input the Subscription Amount. This is the recurring amount that your customer will be billed.
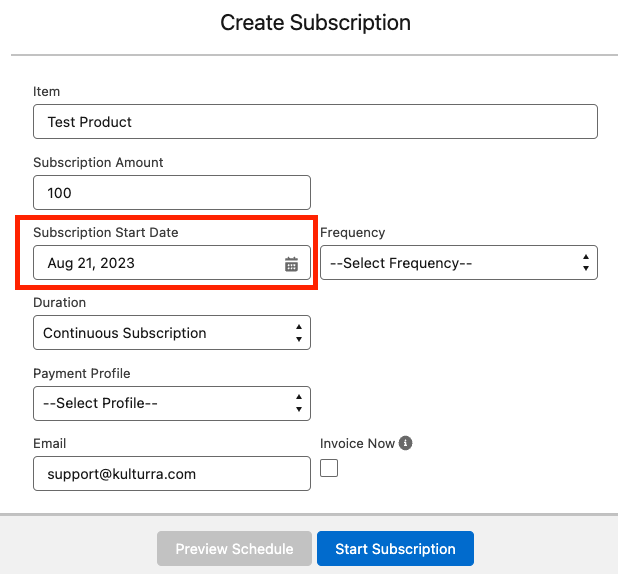
Step 3: Set the Subscription Date
The Subscription Date is the start date for the recurring invoice. This is when your customer will start being billed.
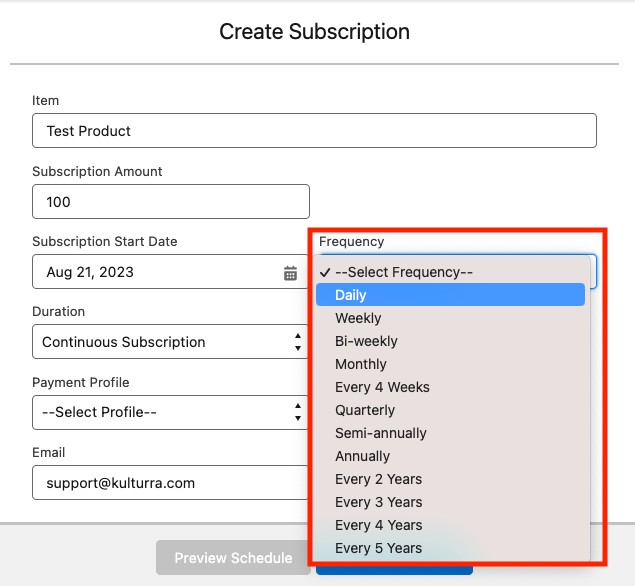
Step 4: Choose the Frequency
The Frequency is the interval at which invoices are generated. This can be set according to your preference and the agreement with your customer.
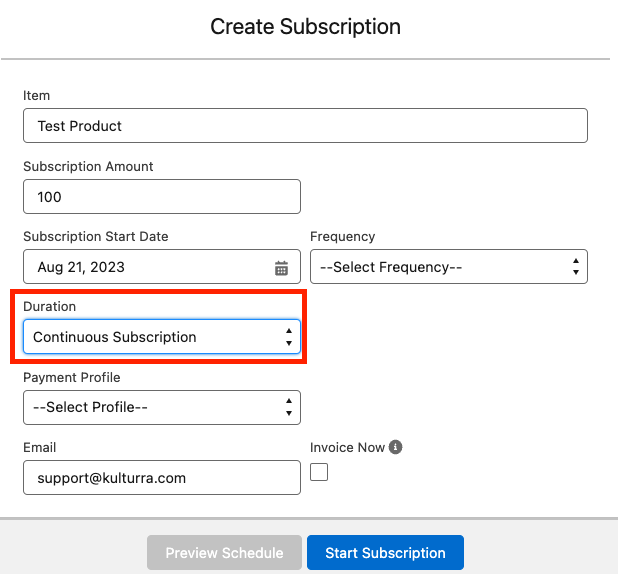
Step 5: Select the Duration
The duration of the subscription can be of three types:
Continuous Subscription: This option does not have an end date and invoices will be generated each month. Note that there is no option to preview the schedule of payments when this option is selected.
Count: This option will be applicable if you want to specify how many payments will be taken out. This allows the user to preview the payment schedule.
End Date: Invoices will only be generated up until the date indicated on the Subscription end date field. This option also allows the user to preview the schedule of payments.
Step 6: Choose the Payment Profile
The Payment Profile allows the user to select the payment profile that will be used for the recurring invoice.
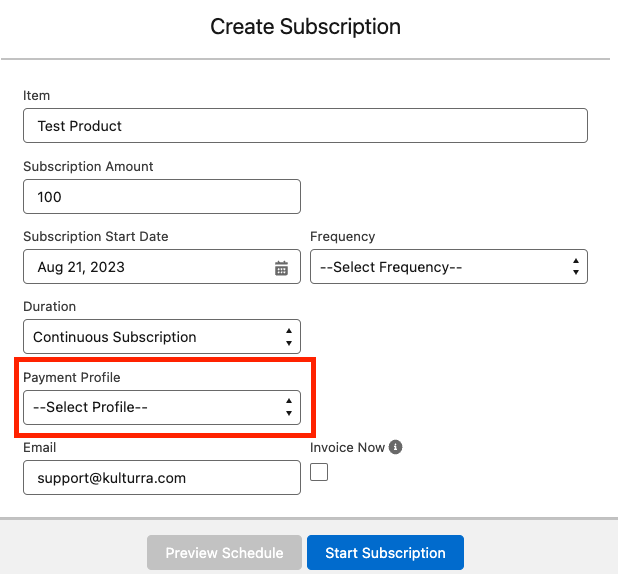
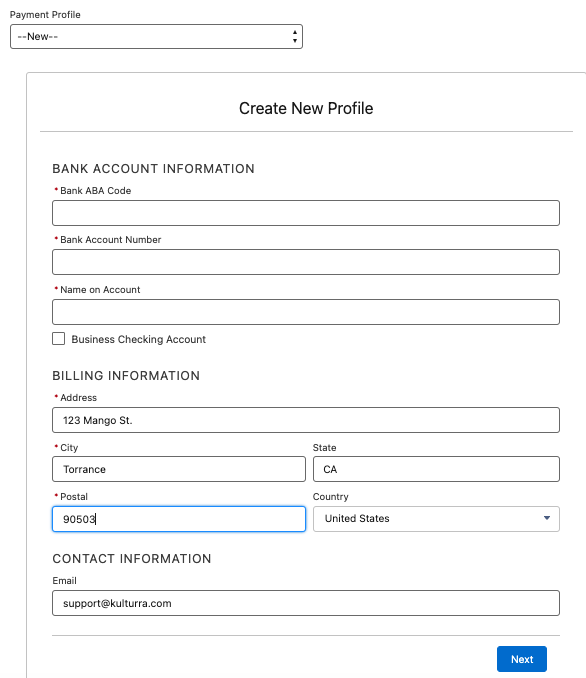
You can also create a New Payment Profile. From the drop-down menu, select New, you would then see the payment terminal where you'd be able to input your credentials. Once credentials are saved, the newly created Payment Profile will be used in the recurring invoice.
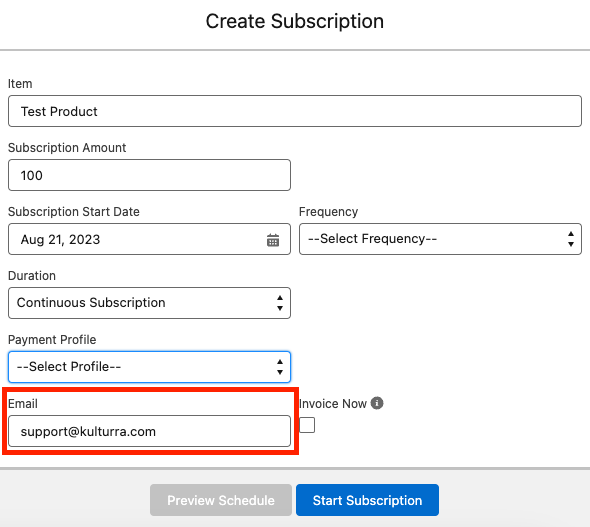
Step 7: Set the Email
By default, the email address on the related contact record will be used. However, this can be edited so you can change this to a different email address if needed.
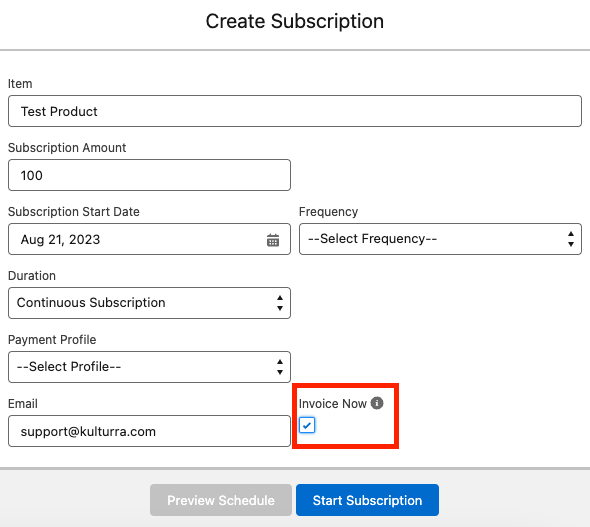
Step 8: Checking the 'Invoice Now' Box
When setting up the subscription for a recurring invoice, you'll come across a checkbox labelled Invoice Now. When you check this box, and the subscription start date and the first invoice date are set to the current date, the invoice will be generated and the customer will be charged immediately.
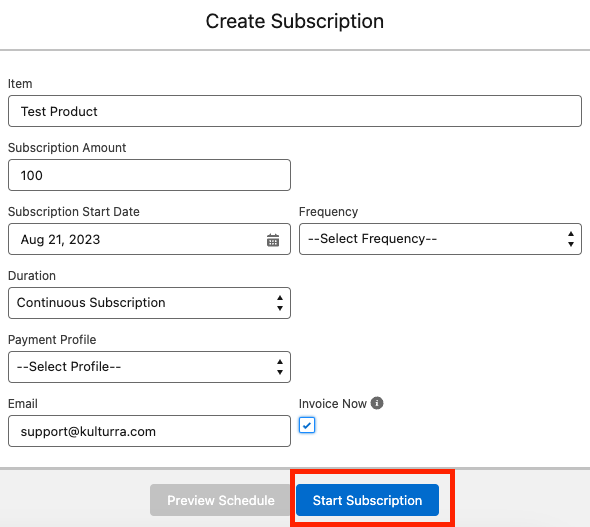
Step 9: The 'Start Subscription' Button
After setting up the parameters for the subscription, the next step is to click on the Start Subscription button. This action will trigger the system to generate a recurring invoice based on the details you've provided.
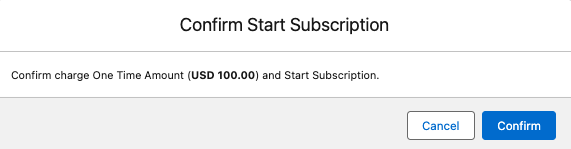
Step 10: The Confirmation Screen
Once you've clicked Start Subscription, a confirmation screen will appear. This screen indicates that a record has been created in the system. You'll see the details of the subscription you've just set up, along with the first invoice that has been generated.
That's it! With these simple steps, you can effortlessly create a recurring invoice using the Subscription Billing Component. Happy invoicing!
Generating an Installment Plan with Subscription Billing Component
Crafting an installment plan for your customers can be a breeze with the Subscription Billing Component. We'll guide you through the process of creating an installment record step by step.
Step 1: Navigate to the Lightning Record Page
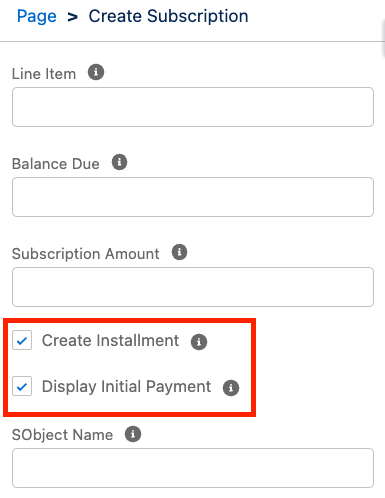
Begin by going to the Lightning Record Page. Make sure the 'Create Installment' box is checked. This action sets the stage for creating installment records.
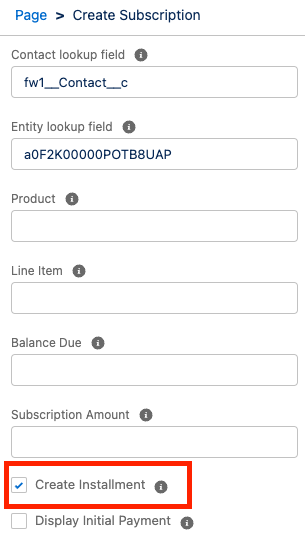
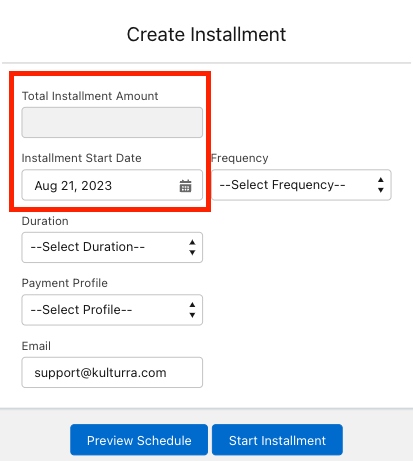
Step 2: Observing Field Changes
Upon setting Create Installment to true, you'll notice a change in the component fields displayed. Total Installment Amount and Installment Start Date will be visible. This change confirms that the records that will be created are installment records.
Step 3: Filling in the Details
Next, fill in the necessary details. This includes Line Item, Total Installment Amount, Installment Start Date, Frequency, Email, Payment Profile, and Duration.
Step 4: Setting the Duration
Duration is a critical component of the installment plan. The options available are End Date, Count, and Balance Due (amount):
Count: The installment amount will be divided by the number of payments.
End Date: The installment amount will be divided by the number of months.
Balance Due: Selecting this option allows users to specify the amount that will be charged per installment. This is done by filling in the 'Amount Per Installment' field.
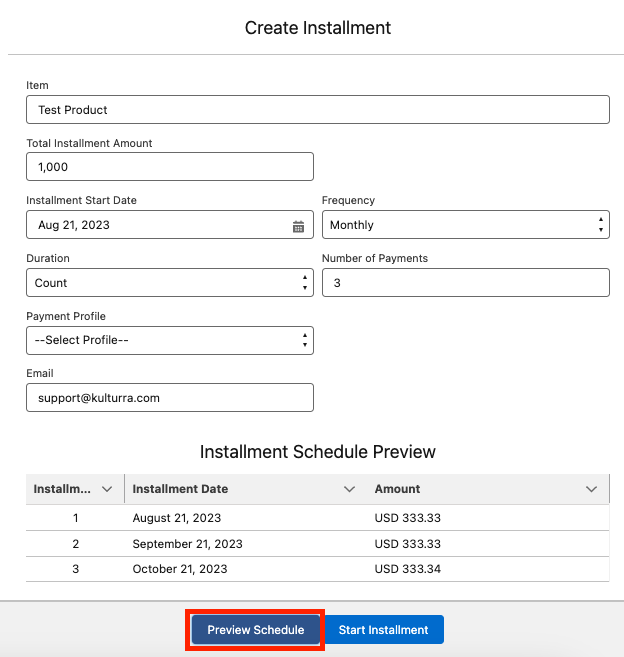
Clicking on Preview Schedule will give you a schedule of payments, allowing you to review and confirm the details before proceeding.
Step 5: Set Up Automatic Charging
Customer will be charged on the Installment date that is set.
Step 6: Create Recurring Invoice Record
Finally, click on 'Start Installment' to generate the installment records.
In summary, the Subscription Billing Component offers a user-friendly and efficient way to set up installment plans. By following these steps, you can create and manage installment records with ease.
Activating Initial Payment for Recurring Invoices
The option for initial payments is an excellent feature when dealing with recurring invoices. It enables you to define a different amount for the first payment, which can be particularly useful in various business scenarios. This article provides a straightforward guide on how to enable this feature using the Subscription Billing Component.
Step 1: Navigate to the Lightning Record Page
To get started, head over to the object's Lightning Record Page.
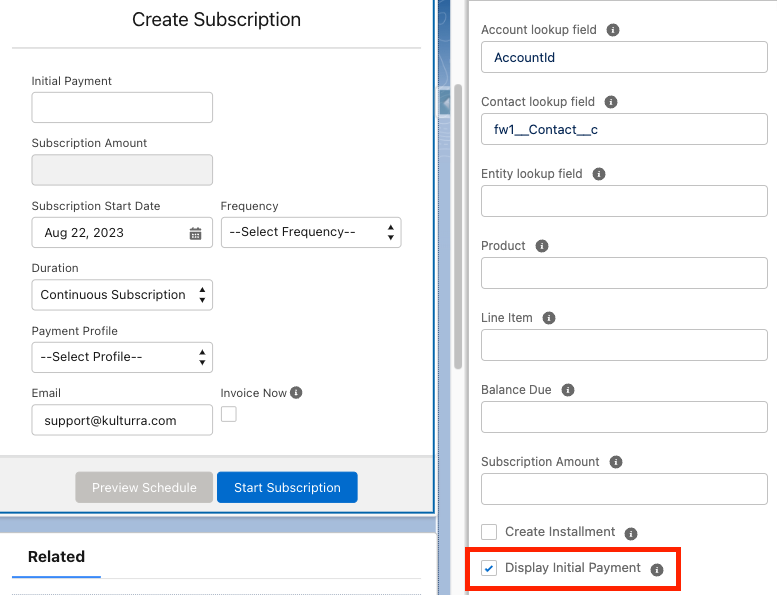
Step 2: Enable the 'Display Initial Payment' Option
Look for the Display Initial Payment option on the page and tick the checkbox to enable this feature.
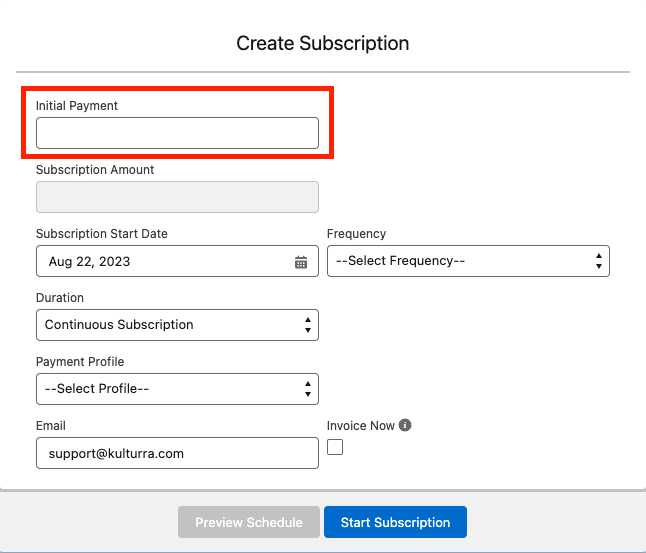
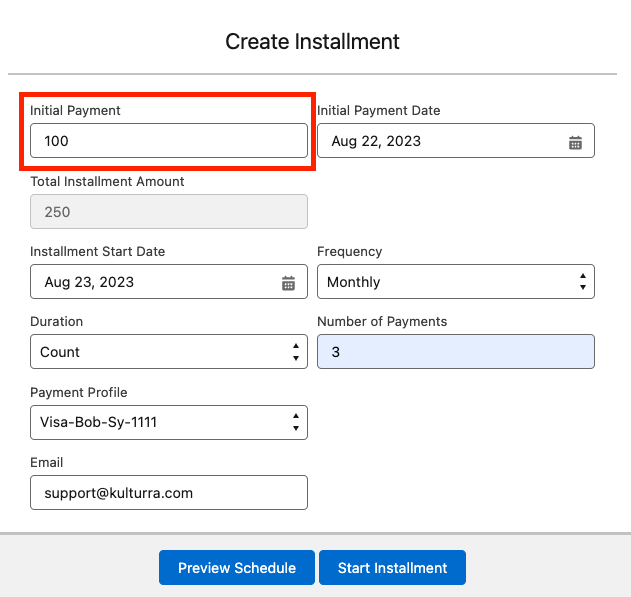
Step 3: Specify the Initial Payment Amount
Once you have enabled the Display Initial Payment option, an Initial Payment field will appear. Here, you can specify the amount to be charged for the first payment. This amount can be more or less than the recurring invoice amount, depending on your business strategy or agreement with the customer.
The Preview Schedule button allows you to view the payment schedule based on the details you've entered. This gives you a clear snapshot of the billing cycle, which can be useful for both you and your clients.
Step 4: Start the Subscription
After specifying the initial payment amount, don't forget to click Start Subscription. A confirmation screen will pop up confirming that an initial payment or one time charge amount will be added on the first invoice.
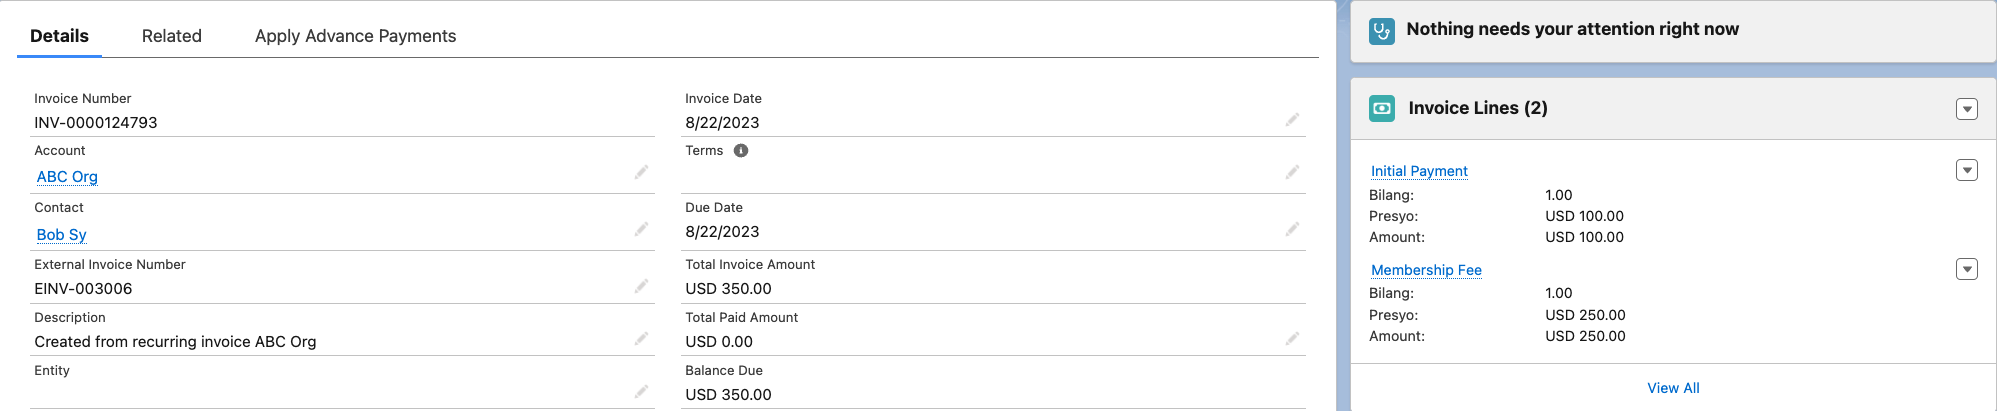
In the Recurring Invoice Lines, the Initial Payment is created as a separate line item and is tagged as 'non-recurring'. This ensures that when the next invoice is generated, the initial payment will not be included.
This is the first invoice (with the Initial Payment added):
This is the second invoice generated, where it would only include the recurring line item.

In conclusion, enabling the initial payment for recurring invoices can provide more flexibility and customization to your billing process. By following these simple steps, you can not only enhance your customer billing experience but also gain better control over your revenue cycle.
Setting Up an Installment Plan with an Initial Payment
Integrating an initial payment into an installment plan can add an extra layer of flexibility to your billing process. This section will walk you through the steps to create an installment plan with an initial payment using the Subscription Billing Component.
Step 1: Enable Installment and Initial Payment
Start by navigating to the objects Lightning Record Page and ensure that both the Create Installment and Display Initial Payment boxes are checked. This enables the installment and initial payment features.
Step 2: Specify the Initial Payment Date
With these options enabled, you will have the ability to specify the Initial Payment Date. This is the day on which the initial payment will be charged.
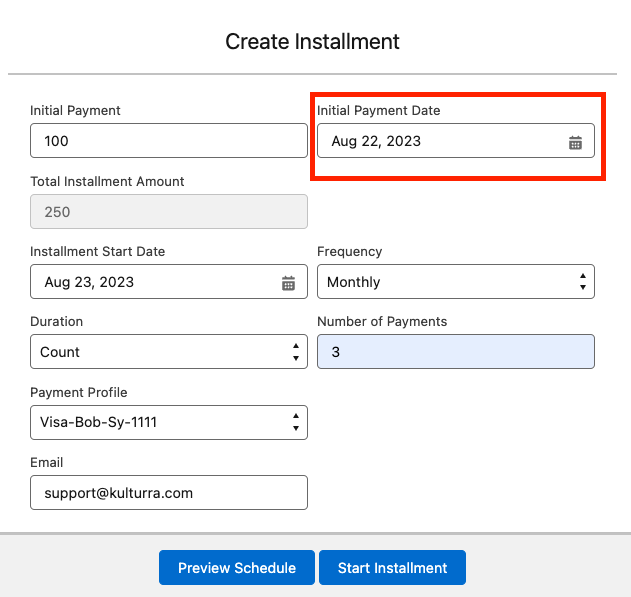
Step 3: Deduct Initial Payment from Total Amount
The Initial Payment Amount will then be deducted from the Total Installment Amount. The remaining balance will then be divided equally, based on either the number of installments or the end date you've set.
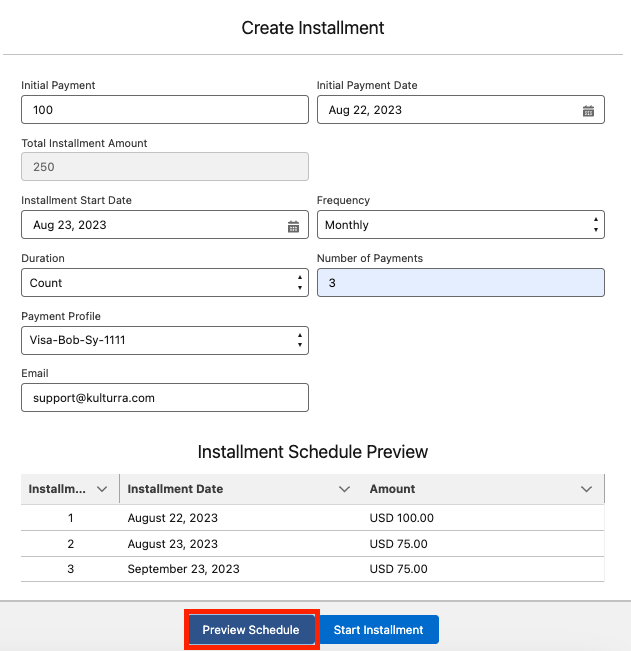
Step 4: Preview the Payment Schedule
Clicking on Preview Schedule allows you to review the payment schedule. This provides a comprehensive overview of the billing cycle.
Step 5: Select a Payment Profile
You can select an existing Payment Profile or you can create a New Payment Profile as well.
Step 6: Create Installment Records
Once you're ready, click Start Installment. This will then be the confirmation screen indicating that installment records were created.

Please note that if the Initial Payment date or Installment Date is set to the current date, the customer will be charged automatically.
Handle Payment Errors
The system also handles payment errors efficiently. For instance, if a user inputs an invalid card, an Automatic Payment Failed email will be sent, notifying them of the issue.
The Subscription Billing Component offers a user-friendly way to create an installment plan with an initial payment. This feature provides businesses with more billing options, ultimately enhancing the overall customer experience.
Incorporating Subscription Billing into a Salesforce Flow
Salesforce Flows provide a visual way of representing your business processes. With the Subscription Billing Component, you can add subscription billing right into your flow. Steps below will guide you through the process of incorporating payment profile creation and subscription billing into a Salesforce Flow.
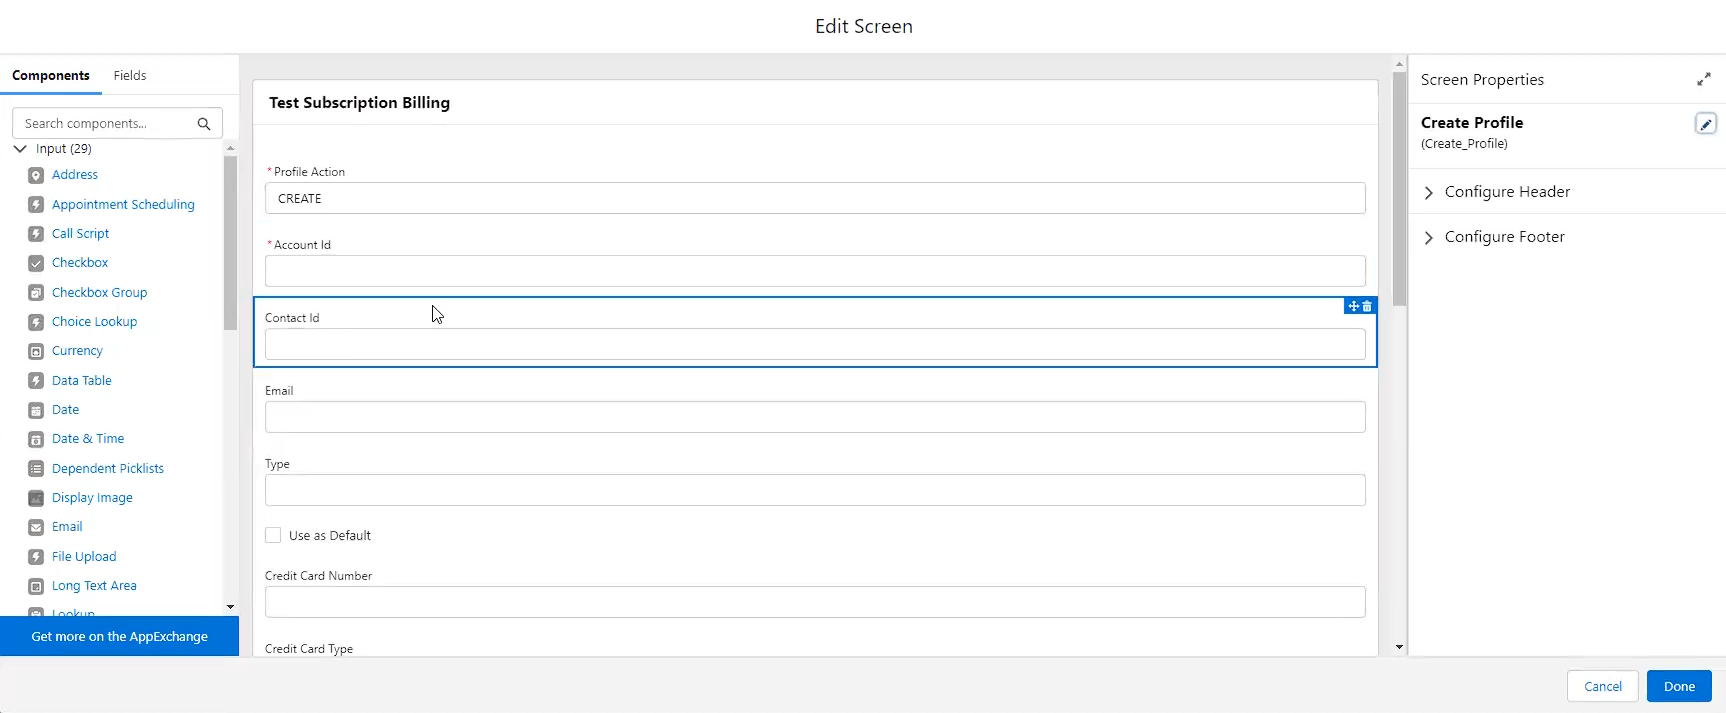
Step 1: Adding a Screen Flow Element for Payment Profile Creation
To begin, you'll need to add a Screen Flow element that will facilitate the creation of a payment profile. This step allows you to collect necessary details like payment method, card details, and billing address from the customer.
To do this:
Open your Flow in the Flow Builder.
From the toolbox on the left, drag a Screen element onto the canvas.
Configure the Screen properties as needed and add the necessary form fields for capturing payment profile details.
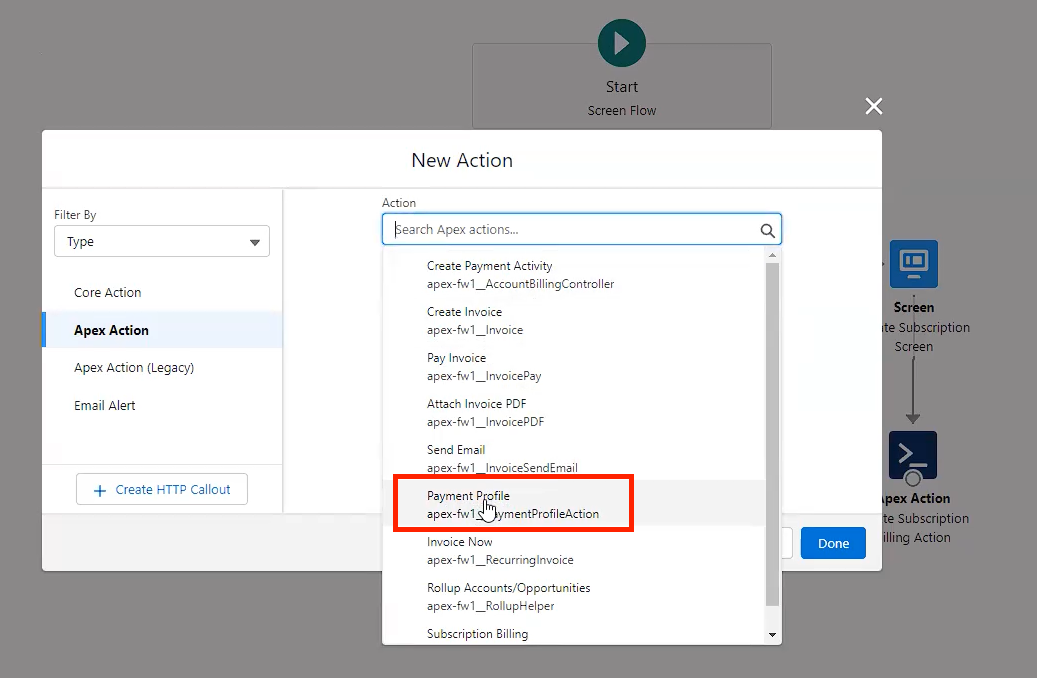
Step 2: Incorporating an Apex Action for Payment Profile Creation
Once you've set up the screen to collect payment profile details, the next step is to add an Apex Action that will handle the creation of the payment profile in the back-end.
From the toolbox, drag an Action element onto the canvas.
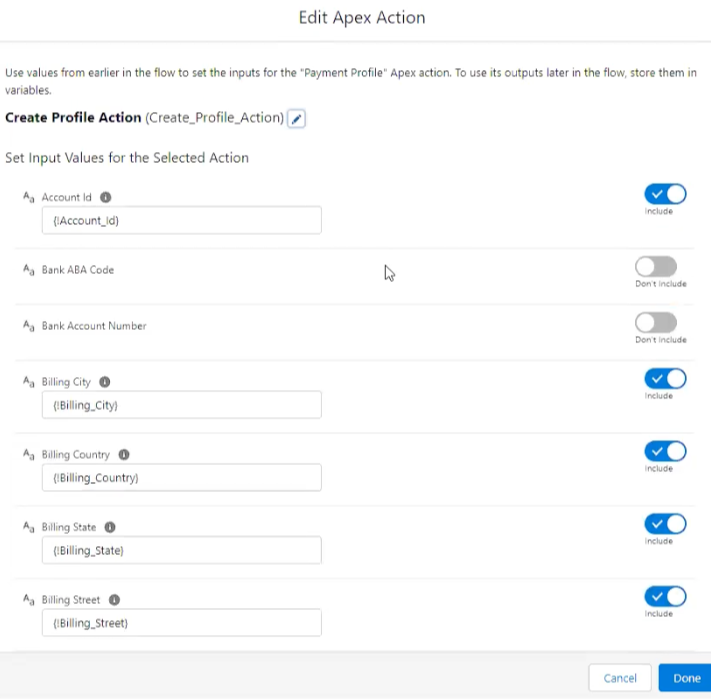
In the Action's properties, select the Apex class that corresponds to payment profile creation.
Map the input and output variables as needed.
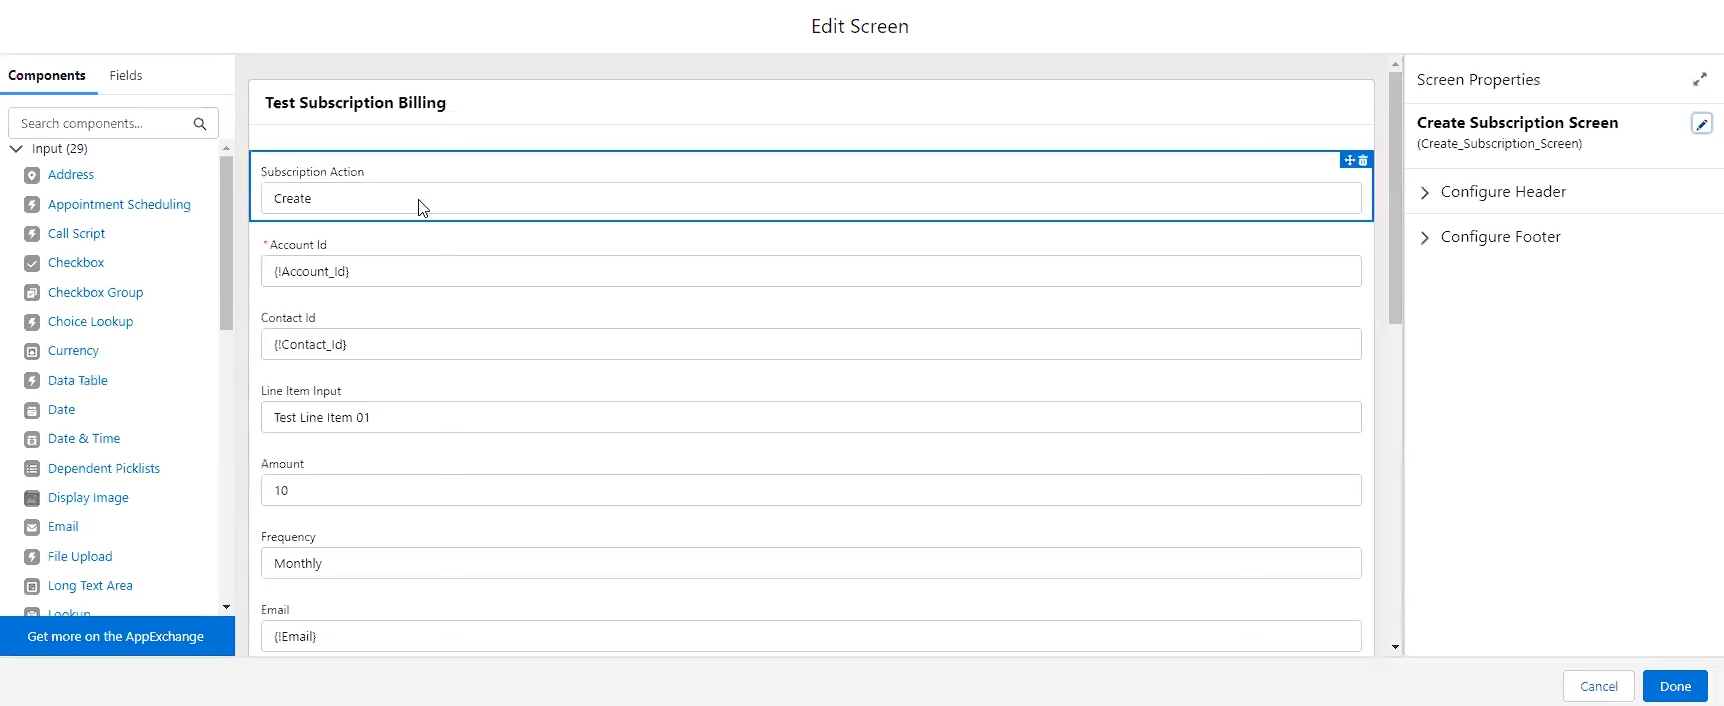
Step 3: Adding Subscription Billing Screen Flow
Next, you'll want to add a screen for setting up the subscription billing details. This screen will collect details like the subscription amount, frequency, start date, and duration.
Drag another Screen element onto the canvas, and add the necessary form fields for capturing subscription details.
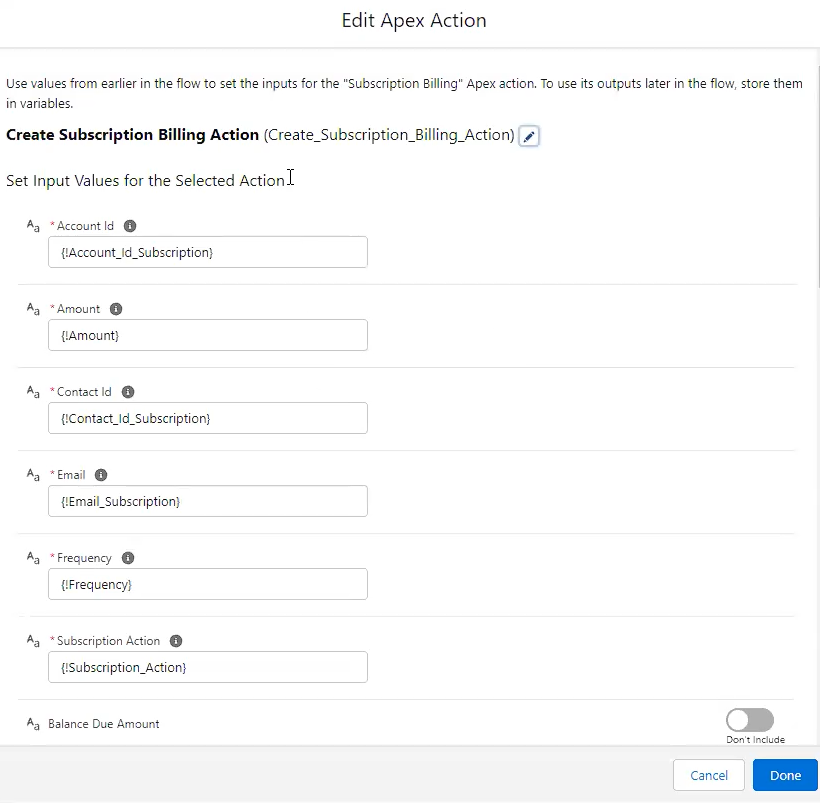
Step 4: Adding Subscription Billing Apex Action
Finally, add an Apex Action that will handle the creation of the subscription billing record based on the details collected in the previous screen.
Drag another Action element onto the canvas.
In the Action's properties, select the Apex class that corresponds to subscription creation.
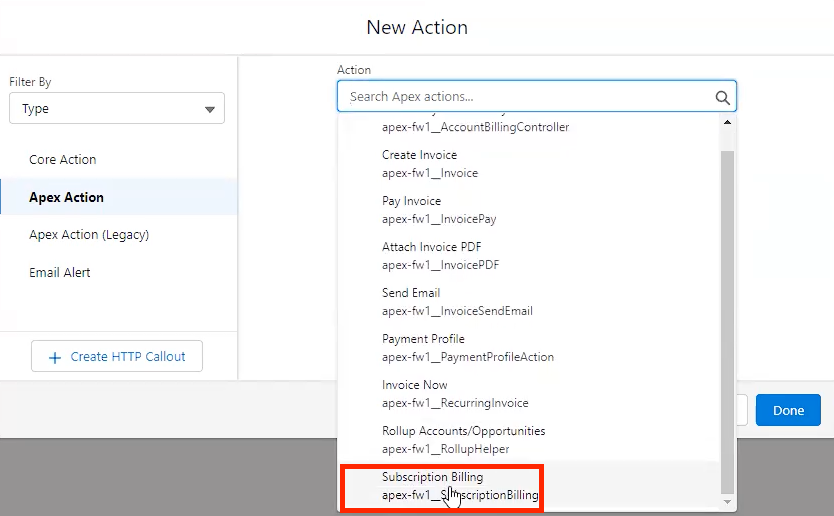
Map the input and output variables as needed.
By following these steps, you can seamlessly integrate subscription billing into your Salesforce Flow, creating a more streamlined and automated billing process for your business.
Enabling Multiple Line Items for Recurring Invoices or Installments
Customers often require multiple line items for their recurring invoices or installments. In simpler terms, you may wish to automatically transfer the line items/products from one object (i.e. Opportunity) to the newly generated invoice record. To help you achieve this for your customers with efficiency, kindly follow the steps below:
The Basics: Understanding Your Setup
First and foremost, you should have a child object that contains the line items that you wish to incorporate into your recurring invoice or installment. Once this setup is correctly implemented, the component will interpret the values on the child object. Consequently, these values will be transferred to the Recurring Invoice/Installment in the form of Invoice Lines.
Step 1: Initiating Your Setup
To initiate this setup, start by heading to Setup, and from there, search and select Custom Metadata Types.

Step 2: Managing Subscription Billing Line Item Mapping
Next, look for Subscription Billing Line Item Mapping in your custom metadata. Select it and click on Manage Subscription Billing Line Item Mappings.

Step 3: Copying the Mapping Name
First, you need to create a line item mapping record then copy the Subscription Billing Line Item Mapping Name. This mapping name will be crucial as you continue with the setup.
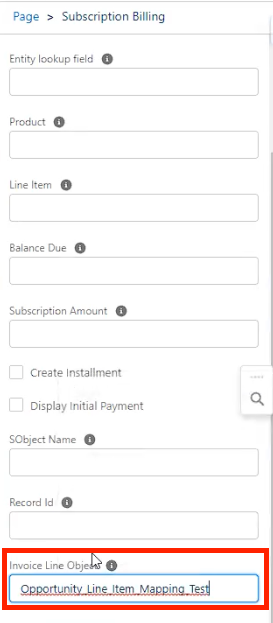
Step 4: Adjusting the Invoice Line Object Parameter
Once you have copied the mapping name, you need to add it to the Invoice Line Object Parameter. This parameter is the place where the line items for your recurring invoices are held.
Step 5: Mapping The Fields
This step involves you mapping your fields according to your preference. Please see sample mapping below:
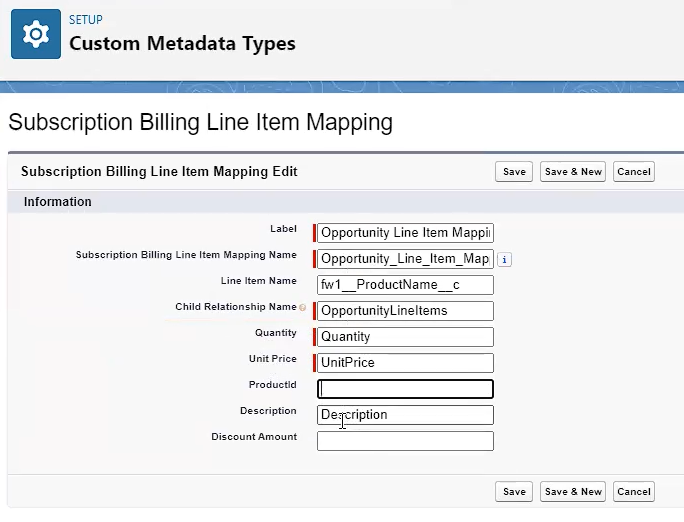
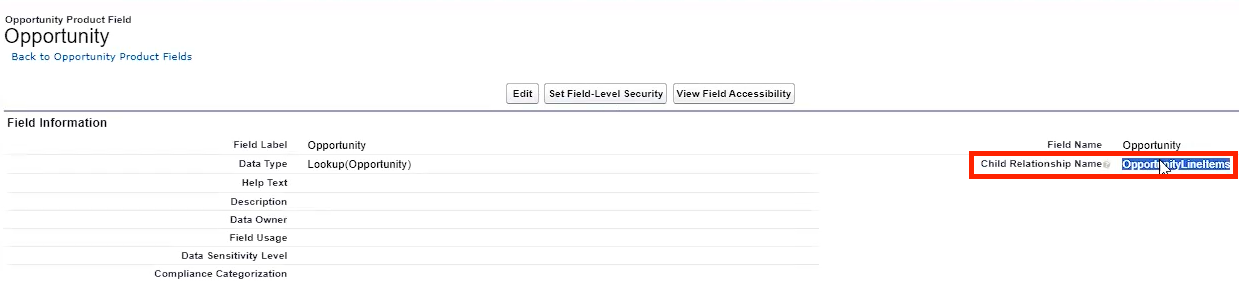
To retrieve the Child Relationship Name, go to Object Manager. Search for the child object (i.e. Opportunity Product). Click on Fields and Relationships then find your parent object (i.e. Opportunity). Copy the value indicated on the Child Relationship Name field. Please note that if you'll be using a custom object, ensure to include the suffix __r.
Remember, if you decide to populate the ProductID field, there is no need to populate the Child Relationship Name. This is important to ensure that there is no redundancy in your invoice line item's field setup.
With your setup complete, you will notice that the Subscription Amount is grayed out on your platform. However, there is no need for concern. This means that the amount is now automatically calculated from the total line items amount from the defined child object.
Below is a list of parameters that the Subscription Billing component accepts:
Account lookup field - This is the only parameter that is required since you cannot create a recurring or installment record without an Account. This parameter accepts a field or recordID.
Contact lookup field - This parameter is not requires. This parameter also accepts a field or recordID.
Entity lookup field - The name (API name) of the Entity look up field defined in the object. If you're using entities, you can reference a field in the record.
Product - You can add a ProductID or you can also reference a field in the record where subscription billing screen is running. If product is valid then the name and amount will be taken from that product and auto-populated during creation.
Line Item - You can use it to auto-populate the line item field during creation. You can put in a text or reference a field in the record where subscription billing screen is running.
Balance Due - Balance due is only applicable for installments when Duration selected is Balance due. You can put in the value or reference a field in the record where subscription billing screen is running. It will then auto-populate the balance due (Total Installment Amount Due) field for installment.
Subscription Amount - This the recurring amount that will be charged. This field only accepts numbers.
SObject Name - This can be used when using subscription billing in a flow.
Record ID- This can be used when using subscription billing in a flow.
Create installment - You check this box if you want installments created instead of recurring invoice.
Display initial payment - You check this box if you want to use the initial payment feature.
Availability: Summer '23 Release