How can we help you?
Search our knowledge base to get answers to your questions, access video training & more!
Setup
How to Set Up and Use Apple Pay in Payment Center
Updated 1 week ago
Apple Pay offers a simple and secure way for your customers to complete transactions. By enabling it in your Payment Center, you can provide a smooth checkout experience ,whether your customers are paying on Safari or directly from their iPhone. This article will walk you through setting up Apple Pay, what the payment experience looks like for your customers, and important notes about surcharges and payment profiles.
Setting Up Apple Pay
To start using Apple Pay, follow these steps:
1. Enable Apple Pay
a. Go to Payment Center Settings → Payment Processor → CardConnect.
b. Check the box for Enable Apple Pay.
c. Click Save to apply your changes.
2. Verify Your Domain
- Make sure your Payments Site is configured properly.
a. In Salesforce, navigate to Setup → Sites.
b. Locate your Payments Site and click the Site Label (i.e. Payments).
c. In the URL Rewriter Class field, enter ApplePayUrlRewriter.
d. Click Save to update your configuration.

3. Import the Apple Pay Certificate
a. Obtain the Certificate File
- Please contact our support team directly to request the Apple Pay certificate file.
b. Import the Certificate into Salesforce
- Go to Setup → Certificate and Key Management.
c. Click Import from Keystore.
d. Upload the certificate file you received.
e. Click Save once the file is uploaded.

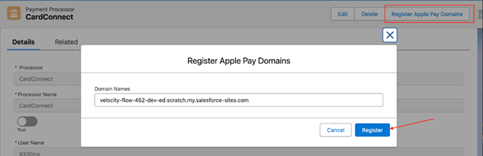
4. Register Your Site's Domain
a. Navigate to Payment Center Settings → Payment Processor.
b. Click Register Apple Pay Domains.
Processor Availability
This feature is currently supported exclusively with CardConnect.
Payment Experience for Customers
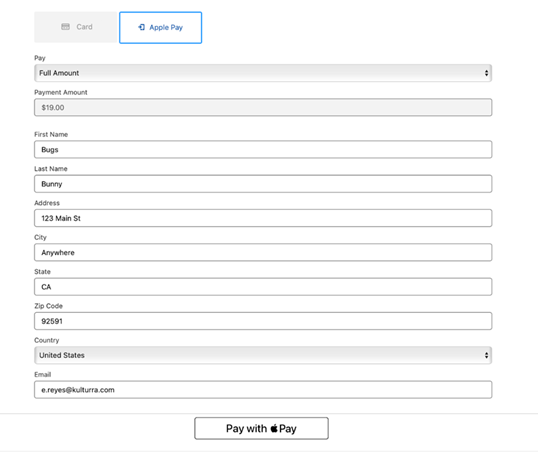
Once Apple Pay is enabled, here’s what your customers will experience:
The customer selects Apple Pay as their payment method
They enter billing details and click Pay with Apple
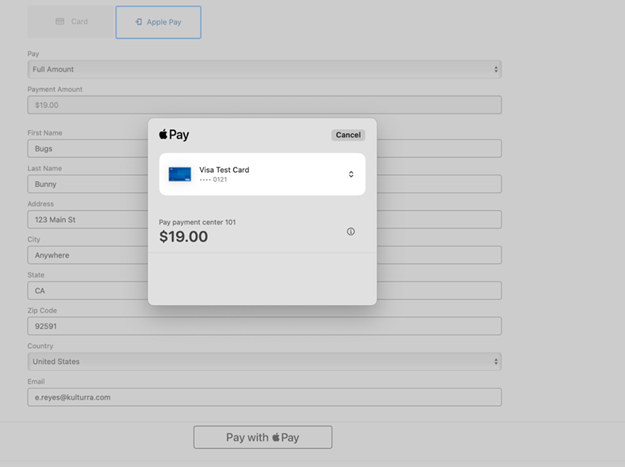
An Apple Pay window pops up, prompting authentication with Face ID or Touch ID
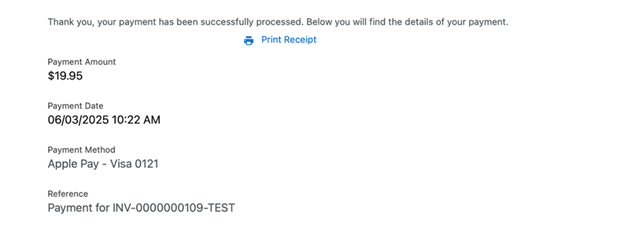
After successful authentication, the system displays a confirmation page
⚠️ Note: The Pay with Apple button only appears on Safari browsers or iPhone devices
Online payments view (site users)
Example of the Apple Pay popup:
3. Surcharges
If your organization applies surcharges, the amount passed to Apple Pay already includes the surcharge. There’s no need for additional configuration.
4. Payment Profiles
Unlike other payment methods, no Payment Profile is created when customers pay using Apple Pay.
By enabling Apple Pay, you’re giving your customers a fast, secure, and convenient checkout experience. Following the steps above ensures everything is configured correctly, so you can focus on what matters most, serving your customers.
Availability: Summer '25